(Explaining better the losing condition) |
m (→Ride Deck) |
||
| (134 intermediate revisions by 14 users not shown) | |||
| Line 1: | Line 1: | ||
| − | [[File:Cardfight-Vanguard.png|center|300px]] |
+ | [[File:Cardfight-Vanguard-overDress.png|center|300px]] |
| − | + | These are the rules of [http://cf-vanguard.com/en/howto/ how to play] the ''Cardfight!! Vanguard'' trading card game. |
|
| + | |||
| − | __NOEDITSECTION__ |
||
| − | == |
+ | ==Object of the Game== |
| + | In ''Cardfight!! Vanguard'', you become a spirit on [[Planet Cray]] that can possess and summon units from your army in order to battle your opponent. Using your units, you attack your opponent's vanguard, and each time your attack hits, your opponent will add one or more cards to their damage zone. As soon as your opponent has 6 or more cards in their damage zone, the game is over and you win. |
||
| − | In order to fulfill one of these condictions, an ability or rule action in current process needs to be resolved first. Therefore, the game will continue if a losing condition no longer exists after resolving an abiliy or rule action. |
||
| ⚫ | |||
| ⚫ | |||
| ⚫ | |||
| ⚫ | |||
| ⚫ | |||
| − | *If both players have fulfilled any losing condition at the same time, the game ends as a draw. |
||
{{clear}} |
{{clear}} |
||
| + | |||
| ⚫ | |||
| + | ==What You Need== |
||
| − | '''As global rule:''' Continuous abilities regarding deck construction of your main deck or G deck, are applied as a replacement effect that changes the following rules. You may only have up to four cards with the same printed card name between your main deck and G deck each (even if anyone has different characteristics except its card name). |
||
| + | ''Cardfight!! Vanguard'' is a trading card game for two players. In order to play, each player must have their own deck of ''Cardfight!! Vanguard'' cards. Players must also have enough space between them to lay out their cards (such as a tabletop). |
||
| + | {{clear}} |
||
| + | |||
| ⚫ | |||
| + | A ''Cardfight!! Vanguard'' deck includes a main deck, and optionally, a G deck. Players may use a pre-constructed [[Trial Deck|trial deck]] or may construct their own deck using cards from their collection. The following rules apply when constructing a deck. |
||
| + | |||
| + | ===General=== |
||
| + | *For each card name, a player may only include up to four cards with that name in their main deck, and up to four cards with that name in their G deck, regardless of their abilities or other characteristics. |
||
| + | *Card abilities that apply during deck construction (e.g. [[Sentinel]]) can modify or add to these rules. |
||
===Main Deck=== |
===Main Deck=== |
||
| − | *Must |
+ | *Must contain exactly 50 cards (including your chosen [[First Vanguard|first vanguard]] and/or [[Ride Deck]]). |
| − | * |
+ | *Must contain exactly 16 [[trigger]] cards. |
| + | *May contain a maximum of 4 [Heal] [[File:Heal symbolV.png|15px]] triggers, regardless of their card names. |
||
| − | *Must have exactly 16 trigger units. |
||
| + | *May contain a maximum of 1 [Over] [[File:Over_Symbol.png|15px]] trigger. |
||
| − | *You may only have up to 4 cards that are heal triggers. |
||
| + | *If you use card sleeves, all main deck cards must have identical sleeves, including your first vanguard (but not including your ride deck). |
||
| − | *You may only have up to 4 cards with the [[Sentinel]] ability. |
||
| + | |||
| + | ===[[Ride Deck]]=== |
||
| + | *This construction can only be used under {{D}} Standard rules. |
||
| + | *Normally consists of exactly five cards (a unit card of each grade 0-1-2-3 and a [[Ride Deck Crest]]). |
||
| + | *If you use card sleeves, the cards you plan to use for the ride deck must have different sleeves from your main deck. However, the sleeves for your ride deck cards do not have to match each other. |
||
===G Deck=== |
===G Deck=== |
||
| − | * |
+ | *May contain up to 16 cards. |
| − | * |
+ | *May only contain cards that are [[G unit]]s. |
| + | *If you use card sleeves, the sleeves you use for your G deck must be different from the main deck. However, the sleeves for your G deck cards do not have to match each other. |
||
===Fighter's Rules=== |
===Fighter's Rules=== |
||
| + | Players must also respect the following sets of regulations while constructing their deck. There are several options under each of the following categories, but both players' decks must adhere to the same sets of regulations in order for them to be used against each other: |
||
*[[Deck Regulations]] |
*[[Deck Regulations]] |
||
*[[Card Restrictions]] |
*[[Card Restrictions]] |
||
*[[Fight Formats]] |
*[[Fight Formats]] |
||
{{clear}} |
{{clear}} |
||
| + | |||
| + | ==Game Concepts== |
||
| + | *If a card's text contradicts the rules, the card's text takes precedence. |
||
| + | *A card in play can be in either {{Stand}} state or {{Rest}} state. A card is placed vertically to indicate {{Stand}} and is rotated 90 degrees to indicate {{Rest}}. |
||
| + | *If a player performs a rule action (playing a card, attacking, activating an ability, etc.), they must fully resolve all effects that resulted from that action before performing another rule action or moving on to the next step or phase of the game. |
||
| + | *If multiple effects or actions are to be performed at once, the player whose turn it is chooses the order they will be resolved in, and resolves them one by one. |
||
| + | {{clear}} |
||
| + | |||
==Reading the Card Layout== |
==Reading the Card Layout== |
||
| − | [[File: |
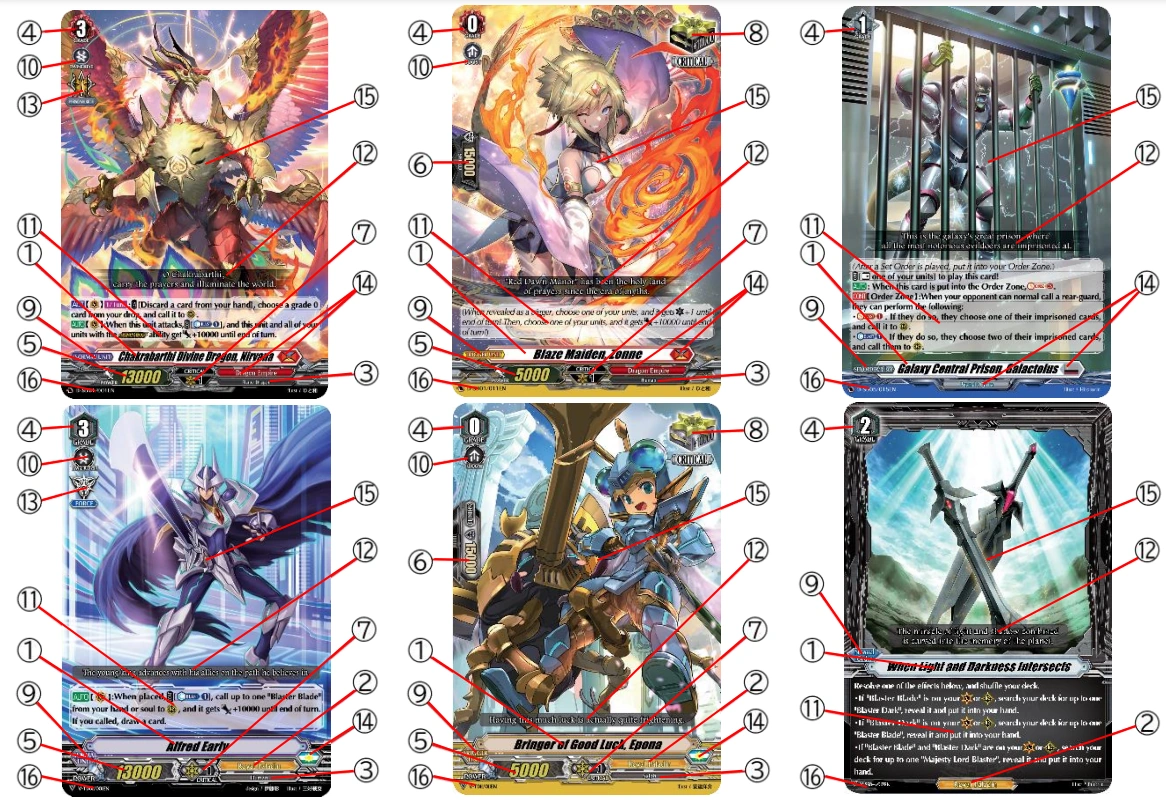
+ | [[File:ReadTheCardD.png|450px|right]] There are several relevant properties printed on a card that concern gameplay. These are collectively known as the "original characteristics" of the card. |
| − | #'''Card name''': The |
+ | #'''Card name''': The name of the character or object that the card represents. In card text, card names appear within "" quote marks. Cards printed in Japanese may have small characters called ''[https://en.wikipedia.org/wiki/Furigana furigana]'' printed above the characters in the card's name; these are a pronunciation guide to help players read the name correctly, and are not considered a part of the card name and have no effect on gameplay. |
| − | #'''[[Clan]]''': The name of the clan |
+ | #'''[[Clan]]''': The name of the clan that the character or object represented by the card belongs to. In card text, the name of a clan appears within "《》" brackets in Japanese and "«»" brackets in English. If a card has a nation name listed instead of a clan name, it is considered to belong to all clans of that nation. |
| − | #'''[[Race]]''': The |
+ | #'''[[Race]]''': The race of the character represented by the card. In card text, the name of a race appears within "<>" brackets. |
| − | #'''Grade''': |
+ | #'''Grade''': This is a numeric value that indicates how powerful the card is and is the main limitation on the stage of the game in which the card can be played. A card's grade can be from 0 to 5, with higher grade cards being more powerful than lower grade cards. |
| − | #'''Power''' |
+ | #'''{{Power|no}}''': The numeric value that expresses the strength of a unit when attacking. |
| − | #'''Shield''' |
+ | #'''{{Shield|no}}''': The numeric value that expresses the strength of a unit when used for defense. |
| − | #'''Critical''' |
+ | #'''{{Critical|no}}''': The numeric value that determines how much damage a unit deals when it successfully attacks. |
| − | #'''[[Trigger]] icon |
+ | #'''[[Trigger]] icon''': This icon represents the trigger ability that activates when that card with the icon is revealed for a trigger check. |
| − | #'''Card |
+ | #'''[[Type|Card type]]''': The type of the card. This is mainly important during deck construction. |
| − | #'''[[Skill icon]]''': |
+ | #'''[[Skill icon]]''': This represents a continuous ability that a card has based on its grade. The icons are: "Boost" [[File:Sk_boost.gif]], "Intercept" [[File:Sk_intercept.gif]], "Twin Drive!!" [[File:Sk_twindrive.gif]], and "Triple Drive!!!" [[File:Sk tripledrive.png]]. |
| + | #'''Text Frame''': This is where the card's abilities are printed. The contents of the text frame are referred to as the card's "text." A summary is given here, but for more information, see [[Card Mechanics#Unit Abilities|Unit Abilities]]. |
||
| − | #'''Text Frame''': The set of abilities a card has is written inside the text frame. The contents within the frame is referred to as "text". Some cards have text within parenthesis to show the description of a keyword or a keyword ability. This is called reminder text. Reminder text is part of the text, but it is just for explanatory purposes, and does not affect the game. Some cards may not have any ability on them. An ability is divided into three categories, known as "[[File:Auto_icon.png|25px]]", "[[File:Act_icon.png|25px]]", and "[[File:Cont_icon.png|25px]]". If an ability has a text within brackets "[ ]" or has "[[File:Cost_icon.png|35px]]", that text is a cost to pay as long as the conditions met. An ability's cost is always optional. Some text is colored differently to put an emphasis on it. The difference in colors has no meaning in terms of rules, however, abilities that are granted by an effect are colored differently, and are not regarded to exist until being acquired. |
||
| + | #* An ability is divided into four categories, three of which are indicated with an abbreviation (in English) or a ''[https://en.wikipedia.org/wiki/Kanji kanji]'' character (in Japanese) indicating when and how the ability is used: |
||
| − | #'''Flavor''': The descriptive text of this card. The flavor is not a characteristic of a card and has no meaning in terms of rules. |
||
| + | #**Automatic ([[File:Auto_icon.png|25px]]/[[File:Auto.png]]): This ability is automatically activated when a specified event happens or a specified condition is met, and is activated once each time the event or condition occurs. |
||
| − | #'''Art''': The image of this card. The art is not a characteristic of a card and has no meaning in terms of rules. |
||
| + | #**Activated ([[File:Act_icon.png|25px]]/[[File:Act.png]]): You can activate this ability during your main phase (see "Main Phase," below) and as many times as you want unless otherwise specified. |
||
| − | #'''Collective Information''': The location where the collection ID, rarity, artist’s name, and other information of this card can be found. The collective information is not a characteristic of a card and has no meaning in terms of rules. |
||
| + | #**Continuous ([[File:Cont_icon.png|25px]]/[[File:Resist_mini.png]]): This ability is continuously active for as long as its conditions are met. |
||
| − | #'''[[Nation]]''': The name of the nation a card belongs to. The nation is referred to by some abilities and effects. There are 6 nations, and they are: [[United Sanctuary]], [[Dragon Empire]], [[Star Gate]], [[Dark Zone]], [[Magallanica]], and [[Zoo]]. Cards with icons that are not any of the 6 listed above, do not belong to any nation, and do not have any nation information. There are cards without the nation icon. If they belong to a clan, they belong to the respective nation. Cards without a nation icon, and cards that do not belong to any of the main 24 clans, nor [[Cray Elemental]], do not belong to any nation. Cards with a nation icon, but do not belong to any specific clan, are regarded as belonging to all of the clans of the respective nation. |
||
| + | #**Order: This is the ability that is performed when you play an order card. Unlike the other ability types, it is not preceded by any icon in card text. |
||
| ⚫ | |||
| + | #* Text within "【 】" brackets indicates the zone(s) the card must be in for the ability to be active or usable. |
||
| + | #* Text within "[ ]" brackets or labeled with a "[[File:Cost_icon.png|35px]]" icon indicates a "cost" (set of one or more actions) that the player must "pay" (perform) in order to use the ability. An ability's cost is always optional, but if the player cannot or chooses not to pay the entire cost, they do not get to use the part of the ability that comes after paying the cost. |
||
| + | #* The icon {{Once}} indicates that the ability can only be used (i.e., have its cost paid in order to use it) once per turn. |
||
| + | #* Within an ability, there may be'' ''italic text within parentheses ''(like this, for example)'' that provides a more detailed description of a keyword or action used within the ability. This is called "reminder text," and is just for explanatory purposes and does not itself affect the game. |
||
| + | #* Some text may be printed in a different color. Different colors of text are used to more clearly indicate additional abilities that a card may gain or lose, but the color of the text itself has no effect on gameplay. |
||
| + | #'''Flavor''': A description or quote relating to the character or object that the card represents. Flavor has no effect on gameplay. |
||
| + | #'''Special Icon''': This represents an ability that a card may have. The Special Icons are: |
||
| ⚫ | |||
| + | #*'''[[Persona Ride]] icon''': Cards with this icon grant the player a corresponding effect if they ride a new vanguard with the same card name as themselves. |
||
| + | #'''[[Nation]]''': An icon of the flag of the nation the card belongs to. On cards printed without a nation icon, the card's clan indicates which nation it belongs to; cards without a nation icon and which do not belong to any of the main 24 clans, nor [[Cray Elemental]], are not considered to belong to any nation. Cards with a nation icon but without a clan listed are considered to belong to all clans of that nation. |
||
| + | #'''Art''': The image of the character or object that the card represents. Art has no effect on gameplay. |
||
| + | #'''Collection Data''': This is where the card's collection ID, rarity, and artist’s name can be found. The only important element in this area in terms of gameplay is whether or not the card has a {{V|FF}} icon, which determines which [[Fight Formats]] the card can be used in. Other than that, collection information has no effect on gameplay. |
||
{{clear}} |
{{clear}} |
||
| + | |||
==Zones of the Game== |
==Zones of the Game== |
||
| − | These are the zones where you and your opponent put |
+ | These are the zones, or locations, where you and your opponent put your cards during the game. |
| + | |||
| + | A zone may be either '''public''' or '''hidden''': |
||
| + | * '''Public''': All players may view the cards in this zone at any time. Cards in this zone are placed face up, and the order of the cards does not matter. |
||
| + | * '''Hidden''': Only the specified player(s) may view the cards in this zone and change their order, unless instructed by a card ability, but all players are allowed to count the number of cards. Cards in this zone are placed face down or otherwise hidden from the player(s) who are not allowed to view the cards in it. |
||
| + | The zones are as follows: |
||
| − | *'''"Deck"''' (山札 ''Yamafuda''), is where you put your main deck at the beginning of the game after shuffling. Cards in this zone are staked in a pile face down. This pile is a hidden zone, and no player can see the information or order of this pile, also cannot change the order of the pile without a reason by game rule. You must always shuffle and cut your main deck at the beginning of each game. |
||
| + | *'''Deck''' (山札 ''Yamafuda''): This is where you put your main deck. This is a hidden zone, and the order of the cards may not be changed. |
||
| − | *'''"G Zone"''' (Gゾーン ''Jī-zōn''), is where you put your G deck at the beginning of the game, always face down. The G zone is a hidden zone, but you may see the information, and change the order of cards in your own G zone. The face down cards are stacked in a pile, and face up cards can be stacked in a separate pile. The G deck don't need to be shuffled at the beginning of the game. You can also store, physically, your gift markers and token units into the G zone at the beginning of the game, but they are not part of the G zone. |
||
| − | *''' |
+ | *'''G Zone''' (Gゾーン ''Jī-zōn''): This is where you put your G deck. This is a hidden zone that only you can look at, and the order of the cards does not matter. During the game, cards in the G zone may be turned face up; face-up cards in the G zone are considered to be in a public zone. |
| − | *''' |
+ | *'''Hand''' (手札 ''Tefuda''): This is where you put the cards that you have drawn and are available for you to use. This is a hidden zone that only you can look at, and the order of the cards does not matter. |
| + | *'''Drop Zone''' (ドロップゾーン ''Doroppuzōn''): This is the ''Cardfight!! Vanguard'' term for the discard pile. This is a public zone. |
||
| − | *'''"Field"''' (フィールド ''Fīrudo''), is where you put all of your units on, always face up. A card on a circle is also regarded as being on the field which the circle belongs to. The field is a public zone, and both players may see the information of cards on them. The order of cards on the field cannot be changed for no reason, except moving them manually between front and back rows of the same column during its player's main phase or using effects. The field consists of two rows and three columns, also they contain 1 vanguard circle and 5 rear-guard circles. The columns are divided into "left column", "middle column", and "right column". The rows are divided into "front row" and "back row". |
||
| + | *'''Field''' (フィールド ''Fīrudo''): This is the main game area and is where players place their units. This is a public zone. Each player's field consists of two rows and three columns. The columns are divided into "left column", "middle column", and "right column", and the rows are divided into "front row" and "back row". Your opponent's columns that are directly in front of your own columns are considered to be the same column (e.g., your right column and your opponent's left column are the same column). |
||
| − | *'''"Circle"''' (サークル ''Sākuru''), is where you put each of your units on individually. Each player has seven circles: 1 vanguard circle, 1 guardian circle, and 5 rear-guard circles. When a card is moved to a rear-guard circle from anywhere other than another rear-guard circle, including from a vanguard circle, unless otherwise specified, it is put vertically as [Stand] state. When a card is moved/put to the vanguard circle from anywhere other than by Legion or Striding, including from a rear-guard circle, unless otherwise specified, it is put vertically as [Stand] state. When a card is placed/put on guardian circle, unless otherwise specified, it is placed/put horizontally as [Rest] state. A circle that have a locked card on it, is not regarded as any of the three aforementioned circles, but a "locked circle". |
||
| − | *''' |
+ | *'''Circle''' (サークル ''Sākuru''): This is where you place your individual units that are on your field. There is a circle at each of the 6 points on a player's field where a row and column intersect, plus 1 more in front of the other circles, for a total of 7 circles: 1 vanguard circle (VC), at the intersection of the front row and the middle column; 5 rear-guard circles (RC), at all of the other row-column intersections; and 1 guardian circle (GC), in front of the vanguard circle. |
| + | **A unit on a circle is also considered to be on the field that the circle belongs to. |
||
| − | *'''"Damage Zone"''' (ダメージゾーン ''Damējizōn''), are cards you put in, either when your vanguard is dealt damage or by a card's cost or effect. When there are six or more cards in your damage zone, and there are no actions being resolved at that point, you lose the game immediately. The damage zone is a public zone, and both players may see the information of face up or face down cards on them. Cards that are face down do not have any card information and cannot be given any information. You may change the order of cards in your damage zone. When you put a card into damage zone, put it on top of the existing ones. |
||
| ⚫ | |||
| ⚫ | *''' |
||
| + | **A circle that has a [[Lock|locked]] card on it is not regarded as any of the above types of circles, but a "locked circle". |
||
| − | *'''"Trigger Zone"''' (トリガーゾーン ''Torigāzōn''), is where you put cards revealed by a drive check or damage check temporarily, always face up. Once per each revealed card, after resolving all effects and actions during that check, the card revealed in the trigger zone is put into its owner's determined zone, depending on the type of check that was performed. Cards revealed by a drive check are put into hand, and cards revealed by a damage check are put into damage zone face up. The trigger zone is a public zone, and both players may see the information of cards on them.. The order of various cards revealed cannot be changed. When you put a card into this zone, put it on top of the existing cards. |
||
| − | *''' |
+ | *'''Soul''' (ソウル ''Souru''): This is a pile of cards stacked underneath your vanguard, consisting of your previous vanguards and other cards that may have been added via card abilities. This is a public zone. Although the soul is physically located on (VC), it is not considered part of the field. |
| − | *''' |
+ | *'''Damage Zone''' (ダメージゾーン ''Damējizōn''): This is where you place cards to represent the damage that your vanguard has taken. This is a public zone. During the game, cards in this zone may be turned face down - both players may look at the face-down cards in this zone, but they are not considered to have any card information and cannot be given any information. If there are six or more cards in your damage zone, you lose the game immediately. |
| ⚫ | *'''Bind Zone''' (バインドゾーン ''Baindozōn''): This is where you place cards that you are instructed to [[bind]] as part of paying for costs or as the result of effects. This is a public zone. Cards in this zone are placed face up, unless the effect that caused them to enter this zone says otherwise; only the owner of face-down cards in this zone may look at them. Cards in this zone that are face down are not considered to have any card information and cannot be given any information. |
||
| + | *'''Trigger Zone''' (トリガーゾーン ''Torigāzōn''): This is where you put cards revealed by a drive check or damage check (see "Drive Step" and "Damage Step," below) for the . This is a public zone. When a card is placed in this zone, if it has a trigger icon, the trigger effect immediately activates. |
||
| + | *'''Removal Zone''' (除外ゾーン ''Jogaizōn''): This is where you put cards that have been removed from the game, such as for [[G Assist]] and [[Ultimate Stride]] or by the effect of "[[Masques]]" units. This is a public zone. Cards in this zone cannot be interacted with in any way, and are only returned to their owners' decks when the game is over. |
||
| + | *'''Gauge Zone''' (ゲージゾーン ''Gējizōn''): This is where you put cards that are equipped due to the [[Gauge]] mechanic. This is a hidden zone that only you can look at. Each gauge zone is associated with a unit on the field. |
||
| + | *'''Order Area''' (オーダー領域 ''Ōdā Ryōiki''): This is where you place [[order]] cards when they are played. This is a public zone. After resolving the effects of a played order card, put it from this zone into the drop zone. |
||
| + | *'''Order Zone''' (オーダーゾーン ''Ōdāzōn''): This is where you place [[Set Order]] cards after they are played. This is a public zone. |
||
| + | *'''Ride Deck Zone''' (ライドデッキ置場 ''Raidodekki Okiba''): This is where you put your [[Ride Deck]]. The order of the cards in the ride deck does not matter. If a card that was in the Ride Deck Zone at the beginning of the game is to be moved into the deck, it is placed face up in the Ride Deck instead. Face up cards in the Ride Deck Storage are considered to be in a public zone, while only the owner can see the face down cards in their Ride Deck. |
||
| + | *'''Crest Zone''' (クレストゾーン ''Kuresutozōn''): This is the zone where [[Crest]]s and [[Ride Deck Crest]]s are placed. This is a public zone. |
||
===Details=== |
===Details=== |
||
| − | These are additional rules |
+ | These are additional rules that relate to zones of the game in general: |
| + | *When multiple cards change zones simultaneously, the owner of the cards chooses the order in which they are moved between the zones. |
||
| − | *While revealing, looking, or searching for cards in a zone, those cards doesn't leave that zone until a new action is performed. |
||
| − | *While |
+ | *While revealing, looking at, or searching for cards in a zone, those cards are still considered to be in that zone unless the effect allowing you to do so instructs you to move the cards to another zone. |
| + | *While shuffling, even if the cards in a hidden zone would be revealed by the effect that is causing you to shuffle, the information of the cards may not be revealed or looked at until shuffling is completed. |
||
| − | *If a card would be moved to a zone without the player of the zone is specified, then the card is moved to its owner's zone. |
||
| − | *If a card |
+ | *If a card would be moved to a zone but does not specify the owner of the zone, then the card is moved to its owner's zone. |
| + | *If a card is moved from a zone to another zone (except when moving from one circle to another) or becomes [[unlock]]ed, then the card is considered to be a new card in its new zone, and all effects that were previously applied on it are no longer applied. However, if an effect moves a card between zones, that effect (and only that effect) treats the moved card as being the same card for as long as the effect lasts. |
||
| − | *Your opponent's columns that are directly in front of your own columns is regarded as being in the same column. |
||
| ⚫ | |||
| ⚫ | |||
| + | **are put into the soul (if they were vanguards); |
||
| ⚫ | |||
| − | **are |
+ | **are retired into the drop zone (if they were rear-guards); or |
| − | ** |
+ | **become heart cards (if the action was done by [[Stride|Striding]]). |
| ⚫ | |||
| − | **become heart cards face up (if the action was done by [[Stride|Striding]]). |
||
| − | *If you have a Legion Mate on your vanguard circle which no longer has an associated Legion Leader, move that unit to your soul. |
||
| ⚫ | |||
| − | *When the effect of a single card moves a card to another zone, if any action would be performed on the card that was moved, that ability follows the card that was moved, and performs the action on that card. |
||
{{clear}} |
{{clear}} |
||
| + | |||
| + | ==Winning and Losing Conditions== |
||
| + | The following conditions cause a player to lose the game. When this happens, the game is immediately over and the other player wins. |
||
| ⚫ | |||
| ⚫ | |||
| ⚫ | |||
| ⚫ | |||
| ⚫ | |||
| + | These conditions are only checked if no abilities or rule actions are being resolved (unless the win or loss was the result of a card's ability). Therefore, if a losing condition exists during an action but no longer exists after its resolution, the game will continue. If both players fulfill one or more losing conditions at the same time, the game ends as a draw. |
||
| + | {{clear}} |
||
| + | |||
==Starting the Fight== |
==Starting the Fight== |
||
| − | # |
+ | #If using a ride deck, each player separates their ride deck from their main deck, then takes the grade 0 unit from their ride deck and puts it face down on their (VC). If not using a ride deck, each player chooses a grade 0 unit from their main deck and puts it face down on their (VC). This unit is known as the player's "[[First Vanguard|first vanguard]]". |
| − | #Each player shuffles and |
+ | #Each player shuffles their main deck and offers it to their opponent for a cut. Then each player puts their main deck into the deck zone face down, ride deck into the ride deck storage face down, G deck into the G zone face down, and any [[Imaginary Gift|markers]] or [[Token unit|tokens]] they plan to use near the G zone. |
| − | #Use a random method to decide who will take the first turn, such as rock-paper-scissors or a coin toss. The player who goes first cannot declare an attack during |
+ | #Use a random method to decide who will take the first turn, such as rock-paper-scissors or a coin toss; the winner of the random method must go first. The player who goes first cannot declare an attack during their first turn. |
| − | # |
+ | #Each player draws five cards from their deck to form their opening hand. In turn order, each player may choose any number of cards from their hand, put them on the bottom of their deck, and draw the same number of cards. That player must shuffle their deck if they returned any cards this way. Both players may perform this step once each. |
| − | #When both players are ready, |
+ | #When both players are ready, they simultaneously turn their first vanguards face up, and call out, "Stand Up, Vanguard!" |
{{clear}} |
{{clear}} |
||
| + | |||
==Turn Phases== |
==Turn Phases== |
||
| − | Both players go through |
+ | Both players go through each of these phases in this order during their turns, until the game is over. All effects that occur within a phase or step must be fully resolved before players may move on to the next phase or step. |
==='''Stand Phase'''=== |
==='''Stand Phase'''=== |
||
| + | Turn all of the cards on your field and order zone from {{Rest}} to {{Stand}}. |
||
| − | During your stand phase, turn all of your units that are rest [[File:Rest.png]] (horizontal) to stand [[File:Stand.png]] (vertical) one by one, unless they are prevented from doing so by an ability. After resolving all effects, proceed to the draw phase. |
||
==='''Draw Phase'''=== |
==='''Draw Phase'''=== |
||
| − | The draw phase takes two steps, which must be done in this order, and only once each turn. |
||
====1. Draw Step==== |
====1. Draw Step==== |
||
| + | Draw a card. |
||
| − | Take the first card from the top of your deck, and put it into your hand without revealing it. This is known as "draw a card". |
||
====2. G Assist Step==== |
====2. G Assist Step==== |
||
| − | + | {{Main|G Assist}} |
|
| + | |||
| − | <br /> |
||
| + | If you do not have a unit in your hand that is one grade higher than your vanguard, you may perform [[G Assist]]. This action will help you to not miss your chance to ride to the next grade. You may perform G Assist once per turn. If a ride deck is used, this step is not applied at all. |
||
| + | |||
==='''Ride Phase'''=== |
==='''Ride Phase'''=== |
||
| − | The ride phase takes two steps, which must be done in this order, and only once each turn. |
||
====1. Ride Step==== |
====1. Ride Step==== |
||
| − | + | During this step, you may [[ride]] a new vanguard. To do so, choose a unit from your hand whose grade is one greater than or equal to your current vanguard's grade, and place it face up on your (VC) as {{Stand}}. This action is called "normal ride." You may perform a normal ride once per turn. |
|
| + | |||
| + | If you are using a [[Ride Deck]], instead of riding a unit from your hand, you may discard a card from your hand to ride a unit from your ride deck whose grade is 1 higher than the grade of your current vanguard. This is also considered a "normal ride," and you cannot ride from your ride deck if you have already normal rode during the same turn. |
||
| + | |||
| + | Whenever you ride a new vanguard, your previous vanguard is moved to your soul. If you ride a unit with an [[Imaginary Gift]] or [[Persona Ride]] icon, apply that icon's effect immediately. |
||
====2. Stride Step==== |
====2. Stride Step==== |
||
| + | {{Main|Stride}} |
||
| − | ''Main articles: [[Stride]], [[Ultimate Stride]]'' |
||
| + | |||
| − | <br /> |
||
| + | If both you and your opponent have a grade 3 or greater vanguard, or if you had a grade 3 vanguard at the start of this turn, you may release a [[G unit]] from your G zone by performing [[Stride]]. You may perform Stride once per turn. |
||
| + | |||
| + | In the Thai format, the requirements for [[Stride]] are different; you may stride if both you and your opponent have ever rode a grade 3 unit during the fight. |
||
| + | |||
==='''Main Phase'''=== |
==='''Main Phase'''=== |
||
| − | During the main phase, you prepare for |
+ | During the main phase, you prepare for battle by calling units and using abilities. You may do the following actions in any order and as many times as you want: |
| + | *Choose a unit card from your hand whose grade is equal to or less than your vanguard's grade, and place it face up on one of your (RC) as {{Stand}}. This action is called "normal [[call]]." |
||
| − | *Normal [[call]] any number of units from your hand to your rear-guard circles, only once each. The cards to be normal called must have the same or lower grade that your vanguard (or your [[Legion]] Leader in such case). |
||
| − | *You may call a unit |
+ | **You may normal call a unit onto a (RC) that already has a unit on it. In that case, after resolving any effects that activated from the call, the unit that was previously on that circle is retired (put into your drop zone). |
| − | * |
+ | *Move one of your rear-guards between the front and back row (RC) of the same column, or exchange the places of two rear-guards on (RC) in the same column. This does not change the units' {{Stand}} or {{Rest}} state. You cannot move a rear-guard to a different column with this action. |
| + | *Use an [[File:Act_icon.png|25px]] ability of one of your cards. |
||
| − | *Play [ACT] abilities; the [ACT] abilities of your cards only can be played during your own main phase. This can be done any number of times, as long as you can pay the cost, unless one of those [ACT] abilities has [1/Turn] on it. |
||
| + | *Play a [[Order|normal order]] or [[Order|set order]] from your hand whose grade is equal to or less than your vanguard's grade. You may play only one order per turn. Place the order card face up in the order area, pay its cost (if any), follow its instructions, then put it into the drop zone (for a normal order) or the order zone (for a set order). |
||
| + | |||
| ⚫ | |||
| ⚫ | |||
| − | <br /> |
||
==='''Battle Phase'''=== |
==='''Battle Phase'''=== |
||
| + | ''Note: The player who goes first may not perform the battle phase on their first turn.'' |
||
| ⚫ | During your battle phase, you may attack with your |
||
| + | |||
| ⚫ | During your battle phase, you may attack with your {{Stand}} units in the front row against your opponent's units. A battle is considered a battle from the moment it begins; even if the process of the battle is cut off midway or if any of the units in the battle leave the field, it still counts as a battle having taken place and always proceeds to the close step. |
||
====1. Start Step==== |
====1. Start Step==== |
||
| − | + | In the start step, you choose whether to attack or not. If you choose not to attack, or if you do not have any units that can attack, proceed directly to the end phase. Otherwise continue to the attack step. |
|
====2. Attack Step==== |
====2. Attack Step==== |
||
| − | + | In the attack step, you choose the units that will do battle. Choose one of your {{Stand}} units in the front row and {{Rest}} it, then choose one of your opponent's units in the front row to attack. These units become the "attacking unit" and the "unit being attacked", respectively, and they become each other's "battle opponents" until the end of this battle. |
|
| − | |||
| − | After choosing the unit to be attacked, you may choose one of your units with boost icon [[File:Sk boost.gif]] on it from your back row in the same column as the attacking unit, and rest it to make it ''boost'' the attacking unit (if it is a vanguard that is Legion, it will boost one of the attacking units under your choice). From this moment, the unit chosen becomes a "boosting unit" and the attacking unit becomes a "boosted unit" by that unit. The state of "boosting unit" and "boosted unit" only remains as long as both units continue present in their respective circles, until end of this battle. |
||
| − | + | If you have a {{Stand}} unit with the Boost [[File:Sk_boost.gif]] skill icon in the back row of the same column as the attacking unit, you may {{Rest}} it to have it "boost" the attacking unit. This unit becomes a "boosting unit" and the attacking unit becomes a "boosted unit" by the boosting unit for as long as both units are present in their respective circles or until the end of this battle. For as long as the unit is a boosting unit, its {{Power}} is continuously added to the {{Power}} of the boosted unit (including if its {{Power}} changes during the battle due to an effect). |
|
| + | Some units have abilities that allow them to battle multiple units at once. In this case, all of the units specified by the ability become the "units being attacked." |
||
| − | Finally, resolve all abilities that were activated in any order, then proceed to the guard step. The real battle begins here. |
||
====3. Guard Step==== |
====3. Guard Step==== |
||
| − | + | In the guard step, your opponent may call guardians to defend against the attack. They may perform the following actions in any order and as many times as they want (or can be skipped, if the opponent declares something like "I don't guard").: |
|
| + | *Choose a unit card from their hand, and normal call it to (GC) as {{Rest}}. Unlike a normal call during the main phase, players may normal call a unit to (GC) regardless of its grade or the grade of their vanguard. |
||
| − | *Your opponent may choose a card from his or her hand and normal calls it to his or her guardian circle as rest. |
||
| − | * |
+ | *Choose a rear-guard with the Intercept [[File:Sk_intercept.gif]] skill icon from their front row, other than a unit being attacked, and move it to (GC) as {{Rest}} (this is not considered a call). This may be done regardless of whether the rear-guard is {{Stand}} or {{Rest}}. |
| − | * |
+ | *Discard a card with "HEAL" (a heal trigger unit) from their hand to call a [[G guardian]] from face down in their G zone onto (GC) as {{Rest}}. They may only do this if both players' vanguards are grade 3 or greater and the number of face-up G guardians in their G zone is three or less. |
| + | *Play a blitz order from their hand whose grade is equal to or lower than their vanguard's grade. They may play one blitz order per turn. This follows the same procedure as playing a normal order during the main phase. |
||
| − | Each time your opponent calls a new unit to (GC) or moves a new unit to (GC) during this battle, he or she chooses which unit it will guard among the units that are being attacked. Then, they resolve all abilities that were activated before calling a new guardian or intercept. Your opponent may continue calling or intercepting guardians, as many times as possible. |
||
| − | + | Each time your opponent calls or moves a new unit to (GC) during a battle, the unit becomes a "guardian." The opponent chooses one of their units being attacked, and the guardian will guard that unit. While the guardian is on (GC) guarding a unit, its {{Shield}} value is continuously added to the {{Power}} of the unit it is guarding. A unit with no printed {{Shield}} value is regarded as having {{Shield}} 0. |
|
| + | Once the opponent has finished, the guard step is over and the battle proceeds to the drive step. No further guardians may be brought into the battle after this step is over. |
||
| − | After resolving all abilities, if you opponent has finished calling guardians or intercepting, proceed to your drive step. |
||
| − | |||
| − | If your opponent chose not to call or intercept guardians against the attack in this step ("I don't guard" for example), proceed to your drive step. |
||
====4. Drive Step==== |
====4. Drive Step==== |
||
| + | {{Main|Drive}} |
||
| − | If the attacking unit is a vanguard, you check for additional effects during the attack, known as "drive check". "Drive" is referred as the amount of drive checks that your vanguard is able to peform in this step. If you need to perform multiple drive checks, check for it one by one, and resolve it one by one. |
||
| + | {{Main|Trigger}} |
||
| − | To drive check, put the top card of your deck into your trigger zone face up. If that card has the same clan as a unit on your vanguard or rear-guard circle, resolve all effects indicated by the trigger icon on the card, in any order you like.<br /> |
||
| − | :''More information: [[Trigger]]'' |
||
| − | + | In the drive step, if your attacking unit is a vanguard, you check for additional effects. Take the top card of your deck and put it into your trigger zone face up. If that card has a [[trigger]] icon, resolve all effects indicated by the trigger icon, in any order you like. Then, if that card is still in the trigger zone, put it into your hand, regardless of whether it has a trigger icon or not. This action is called a "drive check." |
|
| − | :''More information: [[Drive]]'' |
||
| + | Perform a number of drive checks equal to your attacking vanguard's drive. By default, all units have drive 1, but units with the "Twin Drive!!" [[File:Sk_twindrive.gif]] skill icon have drive 2 and vanguards with the "Triple Drive!!!" [[File:Sk tripledrive.png]] skill icon have drive 3. If you perform multiple drive checks, each one must be fully resolved before the next one may begin. |
||
| − | After completing all actions during the drive check, proceed to the damage step. The battle arrives to its climax here. |
||
| + | If you are attacking with a rear-guard that can perform drive checks, apply the drive step for that unit. |
||
| ⚫ | |||
| − | Damage step is to confirm whether the attack to the "unit being attacked" will hit, as well as the damage to be dealt. |
||
| ⚫ | |||
| − | Compare the actual power of the attacking unit with the actual power of the attacked unit, and if the attacked unit's power |
||
| − | + | In the damage step, players confirm whether or not the attack hits and the damage to be dealt. |
|
| − | leaves the field, or if the master of any of these units is changed, or if any of these units is moved to another circle, then the powers are not compared, and the attack does not hit. |
||
| + | Compare the {{Power}} of the two battle opponents. If the attacking unit's {{Power}} is greater or equal, the attack hits; otherwise, it does not hit. If either of the battle opponents have left the field, changed controllers or moved to another circle, then the attack is canceled and does not hit. Regardless of the outcome of the attack, all units on (GC) are retired (put into the drop zone) before resolving the rest of the attack. |
||
| − | If the attack hits, one of two situations occurs, depending on the unit who was hit. Also, retire all the guardians other than G guardianss that were guarding that unit, and all G guardians that were guarding that unit are put into the owner's G zone face up. |
||
| − | *If it is a vanguard, then the attacking unit deals damage equal to its critical (or Legion Leader in such case). If its critical is 0 or less, then it does not deal damage, and zero or negative damage will not regarded as dealt. See below for more details. |
||
| − | *If it is a rear-guard, retire it. After this, resolve all effects and proceed to the close step. |
||
| + | If the attack hits, one of two situations occur, depending on the unit that was hit: |
||
| − | If your opponent's vanguard is dealt damage by the attack, your opponent checks for additional effects, known as "damage check". "Damage" is referred to as the amount of damage checks that the vanguard who dealt damage is able to perform, either during the damage check or a card's effect. If the player need to perform multiple damage checks, he or she checks for it one by one, and resolves it one by one. |
||
| + | *Vanguard: The attacking unit deals damage equal to its {{Critical}} to the attacked unit. If the attacking unit's {{Critical}} is 0 or less, then no damage is dealt. |
||
| + | *Rear-guard: The unit being attacked is retired. |
||
| − | + | If your opponent's vanguard is dealt damage by the attack, your opponent performs a "damage check." To do so, they reveal the top card of their deck and put it into their trigger zone. If that card has a trigger icon and is of the same clan as a unit on their field, they resolve all effects indicated by the trigger icon on the card, in any order they like. Then, if the card is still in the trigger zone, they put the card into their damage zone face up, regardless of whether or not a trigger effect was activated. |
|
| − | :''More information: [[Trigger]]'' |
||
| − | + | This process is repeated as many times as the damage dealt to the opponent's vanguard. If your opponent performs multiple damage checks, they must fully resolve each one before performing the next one. If your opponent has 6 or more cards in their damage zone, the game is over and they lose. |
|
| + | Note that there are no negative consequences for you or your units if your attack does not hit. Therefore it is usually best to attack with as many units as you can each turn. |
||
| − | After completing all actions during the damage check, proceed to the close step. |
||
====6. Close Step==== |
====6. Close Step==== |
||
| − | + | In the close step, all effects that happen "at the end of the battle" occur. After all such effects are resolved, the battle is considered to be over. Units that were designated as "attacking units", "units being attacked", and "battle opponents" during this battle are no longer treated as having any of these designations. |
|
| + | |||
| + | After this step, return back to your start step and choose whether or not to attack again. If you cannot or choose not to attack during your next start step, the battle phase is over. |
||
| − | If you choose not to attack during your next start step, proceed to the end phase, and the battle phase has ended. |
||
| − | <br /> |
||
==='''End Phase'''=== |
==='''End Phase'''=== |
||
| − | + | The end phase is where all actions and effects that occur at the end of a turn are activated and resolved. The following actions take place in the following order: |
|
| − | * |
+ | *All G units on your (VC) and (RC) return to your G zone face up. |
| − | * |
+ | *All [[lock]]ed cards and [[delete]]d units on your field return to normal state and are turned face up. |
| + | *All abilities with "at the beginning of end phase" and "at end of turn" activate, and you resolve them in the order of your choice. |
||
| + | *All effects with "until end of turn" that were applied this turn cease to be applied. |
||
| ⚫ | |||
| − | After resolving these actions, abilities with "when card is unlocked", "when card is put face up" and "when card is put into the G zone" are activated, and resolved in any order. Then, abilities with "at the beginning of end phase" and "at the end of turn" are activated, and resolved in any order. Then, effects with "until end of turn" cease to exist. |
||
| − | |||
| ⚫ | |||
| − | |||
| − | If an effect allows you to get an "[[Extra Turn]]", your opponent cannot declare the beginning of what would be their next turn. |
||
{{clear}} |
{{clear}} |
||
| + | |||
==Card Mechanics== |
==Card Mechanics== |
||
| − | + | For a further glossary of game terms, see: [[Card Mechanics]]. |
|
{{clear}} |
{{clear}} |
||
| + | |||
==Comprehensive Rules== |
==Comprehensive Rules== |
||
| − | The "Comprehensive Rules" is the official manual designed to explain and detail ''all'' the game rules and mechanics. While it explains everything in general, |
+ | The "Comprehensive Rules" is the official manual designed to explain and detail ''all'' of the game rules and mechanics. While it explains everything in general, clarifications on individual cards may be found in the individual cards' [[:Category:Rulings|rulings]]. |
*{{CompRules}} |
*{{CompRules}} |
||
*{{CompRulesJP}} |
*{{CompRulesJP}} |
||
Latest revision as of 21:28, 15 April 2024

These are the rules of how to play the Cardfight!! Vanguard trading card game.
Object of the Game
In Cardfight!! Vanguard, you become a spirit on Planet Cray that can possess and summon units from your army in order to battle your opponent. Using your units, you attack your opponent's vanguard, and each time your attack hits, your opponent will add one or more cards to their damage zone. As soon as your opponent has 6 or more cards in their damage zone, the game is over and you win.
What You Need
Cardfight!! Vanguard is a trading card game for two players. In order to play, each player must have their own deck of Cardfight!! Vanguard cards. Players must also have enough space between them to lay out their cards (such as a tabletop).
Deck Construction
A Cardfight!! Vanguard deck includes a main deck, and optionally, a G deck. Players may use a pre-constructed trial deck or may construct their own deck using cards from their collection. The following rules apply when constructing a deck.
General
- For each card name, a player may only include up to four cards with that name in their main deck, and up to four cards with that name in their G deck, regardless of their abilities or other characteristics.
- Card abilities that apply during deck construction (e.g. Sentinel) can modify or add to these rules.
Main Deck
- Must contain exactly 50 cards (including your chosen first vanguard and/or Ride Deck).
- Must contain exactly 16 trigger cards.
- May contain a maximum of 4 [Heal]
 triggers, regardless of their card names.
 - May contain a maximum of 1 [Over]
 trigger.
 - If you use card sleeves, all main deck cards must have identical sleeves, including your first vanguard (but not including your ride deck).
Ride Deck
- This construction can only be used under
 Standard rules.
 - Normally consists of exactly five cards (a unit card of each grade 0-1-2-3 and a Ride Deck Crest).
- If you use card sleeves, the cards you plan to use for the ride deck must have different sleeves from your main deck. However, the sleeves for your ride deck cards do not have to match each other.
G Deck
- May contain up to 16 cards.
- May only contain cards that are G units.
- If you use card sleeves, the sleeves you use for your G deck must be different from the main deck. However, the sleeves for your G deck cards do not have to match each other.
Fighter's Rules
Players must also respect the following sets of regulations while constructing their deck. There are several options under each of the following categories, but both players' decks must adhere to the same sets of regulations in order for them to be used against each other:
Game Concepts
- If a card's text contradicts the rules, the card's text takes precedence.
- A card in play can be in either [Stand] state or [Rest] state. A card is placed vertically to indicate [Stand] and is rotated 90 degrees to indicate [Rest] .
- If a player performs a rule action (playing a card, attacking, activating an ability, etc.), they must fully resolve all effects that resulted from that action before performing another rule action or moving on to the next step or phase of the game.
- If multiple effects or actions are to be performed at once, the player whose turn it is chooses the order they will be resolved in, and resolves them one by one.
Reading the Card Layout
There are several relevant properties printed on a card that concern gameplay. These are collectively known as the "original characteristics" of the card.
- Card name: The name of the character or object that the card represents. In card text, card names appear within "" quote marks. Cards printed in Japanese may have small characters called furigana printed above the characters in the card's name; these are a pronunciation guide to help players read the name correctly, and are not considered a part of the card name and have no effect on gameplay.
- Clan: The name of the clan that the character or object represented by the card belongs to. In card text, the name of a clan appears within "《》" brackets in Japanese and "«»" brackets in English. If a card has a nation name listed instead of a clan name, it is considered to belong to all clans of that nation.
- Race: The race of the character represented by the card. In card text, the name of a race appears within "<>" brackets.
- Grade: This is a numeric value that indicates how powerful the card is and is the main limitation on the stage of the game in which the card can be played. A card's grade can be from 0 to 5, with higher grade cards being more powerful than lower grade cards.
- Power : The numeric value that expresses the strength of a unit when attacking.
- Shield : The numeric value that expresses the strength of a unit when used for defense.
- Critical : The numeric value that determines how much damage a unit deals when it successfully attacks.
- Trigger icon: This icon represents the trigger ability that activates when that card with the icon is revealed for a trigger check.
- Card type: The type of the card. This is mainly important during deck construction.
- Skill icon: This represents a continuous ability that a card has based on its grade. The icons are: "Boost" , "Intercept" , "Twin Drive!!" , and "Triple Drive!!!" .
- Text Frame: This is where the card's abilities are printed. The contents of the text frame are referred to as the card's "text." A summary is given here, but for more information, see Unit Abilities.
- An ability is divided into four categories, three of which are indicated with an abbreviation (in English) or a kanji character (in Japanese) indicating when and how the ability is used:
- Automatic (/): This ability is automatically activated when a specified event happens or a specified condition is met, and is activated once each time the event or condition occurs.
- Activated (/): You can activate this ability during your main phase (see "Main Phase," below) and as many times as you want unless otherwise specified.
- Continuous (/): This ability is continuously active for as long as its conditions are met.
- Order: This is the ability that is performed when you play an order card. Unlike the other ability types, it is not preceded by any icon in card text.
- Automatic (
- Text within "【 】" brackets indicates the zone(s) the card must be in for the ability to be active or usable.
- Text within "[ ]" brackets or labeled with a "" icon indicates a "cost" (set of one or more actions) that the player must "pay" (perform) in order to use the ability. An ability's cost is always optional, but if the player cannot or chooses not to pay the entire cost, they do not get to use the part of the ability that comes after paying the cost.
- The icon 1/Turn indicates that the ability can only be used (i.e., have its cost paid in order to use it) once per turn.
- Within an ability, there may be italic text within parentheses (like this, for example) that provides a more detailed description of a keyword or action used within the ability. This is called "reminder text," and is just for explanatory purposes and does not itself affect the game.
- Some text may be printed in a different color. Different colors of text are used to more clearly indicate additional abilities that a card may gain or lose, but the color of the text itself has no effect on gameplay.
- An ability is divided into four categories, three of which are indicated with an abbreviation (in English) or a kanji character (in Japanese) indicating when and how the ability is used:
- Flavor: A description or quote relating to the character or object that the card represents. Flavor has no effect on gameplay.
- Special Icon: This represents an ability that a card may have. The Special Icons are:
- Imaginary Gift icon: Cards with this icon grant the player a corresponding Imaginary Gift when the player rides them (see "Ride Phase," below). They are: "Force", "Accel", and "Protect".
- Persona Ride icon: Cards with this icon grant the player a corresponding effect if they ride a new vanguard with the same card name as themselves.
- Nation: An icon of the flag of the nation the card belongs to. On cards printed without a nation icon, the card's clan indicates which nation it belongs to; cards without a nation icon and which do not belong to any of the main 24 clans, nor Cray Elemental, are not considered to belong to any nation. Cards with a nation icon but without a clan listed are considered to belong to all clans of that nation.
- Art: The image of the character or object that the card represents. Art has no effect on gameplay.
- Collection Data: This is where the card's collection ID, rarity, and artist’s name can be found. The only important element in this area in terms of gameplay is whether or not the card has a icon, which determines which Fight Formats the card can be used in. Other than that, collection information has no effect on gameplay.
Zones of the Game
These are the zones, or locations, where you and your opponent put your cards during the game.
A zone may be either public or hidden:
- Public: All players may view the cards in this zone at any time. Cards in this zone are placed face up, and the order of the cards does not matter.
- Hidden: Only the specified player(s) may view the cards in this zone and change their order, unless instructed by a card ability, but all players are allowed to count the number of cards. Cards in this zone are placed face down or otherwise hidden from the player(s) who are not allowed to view the cards in it.
The zones are as follows:
- Deck (山札 Yamafuda): This is where you put your main deck. This is a hidden zone, and the order of the cards may not be changed.
- G Zone (Gゾーン Jī-zōn): This is where you put your G deck. This is a hidden zone that only you can look at, and the order of the cards does not matter. During the game, cards in the G zone may be turned face up; face-up cards in the G zone are considered to be in a public zone.
- Hand (手札 Tefuda): This is where you put the cards that you have drawn and are available for you to use. This is a hidden zone that only you can look at, and the order of the cards does not matter.
- Drop Zone (ドロップゾーン Doroppuzōn): This is the Cardfight!! Vanguard term for the discard pile. This is a public zone.
- Field (フィールド Fīrudo): This is the main game area and is where players place their units. This is a public zone. Each player's field consists of two rows and three columns. The columns are divided into "left column", "middle column", and "right column", and the rows are divided into "front row" and "back row". Your opponent's columns that are directly in front of your own columns are considered to be the same column (e.g., your right column and your opponent's left column are the same column).
- Circle (サークル Sākuru): This is where you place your individual units that are on your field. There is a circle at each of the 6 points on a player's field where a row and column intersect, plus 1 more in front of the other circles, for a total of 7 circles: 1 vanguard circle (VC), at the intersection of the front row and the middle column; 5 rear-guard circles (RC), at all of the other row-column intersections; and 1 guardian circle (GC), in front of the vanguard circle.
- A unit on a circle is also considered to be on the field that the circle belongs to.
- If multiple units are on the same circle, the units are considered to be in the same row and column.
- A circle that has a locked card on it is not regarded as any of the above types of circles, but a "locked circle".
- Soul (ソウル Souru): This is a pile of cards stacked underneath your vanguard, consisting of your previous vanguards and other cards that may have been added via card abilities. This is a public zone. Although the soul is physically located on (VC), it is not considered part of the field.
- Damage Zone (ダメージゾーン Damējizōn): This is where you place cards to represent the damage that your vanguard has taken. This is a public zone. During the game, cards in this zone may be turned face down - both players may look at the face-down cards in this zone, but they are not considered to have any card information and cannot be given any information. If there are six or more cards in your damage zone, you lose the game immediately.
- Bind Zone (バインドゾーン Baindozōn): This is where you place cards that you are instructed to bind as part of paying for costs or as the result of effects. This is a public zone. Cards in this zone are placed face up, unless the effect that caused them to enter this zone says otherwise; only the owner of face-down cards in this zone may look at them. Cards in this zone that are face down are not considered to have any card information and cannot be given any information.
- Trigger Zone (トリガーゾーン Torigāzōn): This is where you put cards revealed by a drive check or damage check (see "Drive Step" and "Damage Step," below) for the . This is a public zone. When a card is placed in this zone, if it has a trigger icon, the trigger effect immediately activates.
- Removal Zone (除外ゾーン Jogaizōn): This is where you put cards that have been removed from the game, such as for G Assist and Ultimate Stride or by the effect of "Masques" units. This is a public zone. Cards in this zone cannot be interacted with in any way, and are only returned to their owners' decks when the game is over.
- Gauge Zone (ゲージゾーン Gējizōn): This is where you put cards that are equipped due to the Gauge mechanic. This is a hidden zone that only you can look at. Each gauge zone is associated with a unit on the field.
- Order Area (オーダー領域 Ōdā Ryōiki): This is where you place order cards when they are played. This is a public zone. After resolving the effects of a played order card, put it from this zone into the drop zone.
- Order Zone (オーダーゾーン Ōdāzōn): This is where you place Set Order cards after they are played. This is a public zone.
- Ride Deck Zone (ライドデッキ置場 Raidodekki Okiba): This is where you put your Ride Deck. The order of the cards in the ride deck does not matter. If a card that was in the Ride Deck Zone at the beginning of the game is to be moved into the deck, it is placed face up in the Ride Deck instead. Face up cards in the Ride Deck Storage are considered to be in a public zone, while only the owner can see the face down cards in their Ride Deck.
- Crest Zone (クレストゾーン Kuresutozōn): This is the zone where Crests and Ride Deck Crests are placed. This is a public zone.
Details
These are additional rules that relate to zones of the game in general:
- When multiple cards change zones simultaneously, the owner of the cards chooses the order in which they are moved between the zones.
- While revealing, looking at, or searching for cards in a zone, those cards are still considered to be in that zone unless the effect allowing you to do so instructs you to move the cards to another zone.
- While shuffling, even if the cards in a hidden zone would be revealed by the effect that is causing you to shuffle, the information of the cards may not be revealed or looked at until shuffling is completed.
- If a card would be moved to a zone but does not specify the owner of the zone, then the card is moved to its owner's zone.
- If a card is moved from a zone to another zone (except when moving from one circle to another) or becomes unlocked, then the card is considered to be a new card in its new zone, and all effects that were previously applied on it are no longer applied. However, if an effect moves a card between zones, that effect (and only that effect) treats the moved card as being the same card for as long as the effect lasts.
- When a unit is placed on, or is moved to, a (VC) or (RC) that already has other units on it (except by using Legion), all abilities that were activated at that point are resolved first. After that, all units that were previously on that circle:
- are put into the soul (if they were vanguards);
- are retired into the drop zone (if they were rear-guards); or
- become heart cards (if the action was done by Striding).
- When multiple cards are moved from a public zone to a hidden zone at the same time, if the owner of those cards can decide the order they are placed in the hidden zone, the owner is not required to let the opponent know the order in which they are placed.
Winning and Losing Conditions
The following conditions cause a player to lose the game. When this happens, the game is immediately over and the other player wins.
- If a player's damage zone has six or more cards, that player loses.
- If a player's deck has no cards, that player loses.
- If a player has no vanguard, that player chooses a card from their soul, and rides it as [Stand] . However, if that player's soul has no cards they can ride, that player loses.
- A player may win or lose the game automatically as a result of a card's ability, such as "Star-vader, "Omega" Glendios".
- A player may concede the game at any time. In this case, that player loses.
These conditions are only checked if no abilities or rule actions are being resolved (unless the win or loss was the result of a card's ability). Therefore, if a losing condition exists during an action but no longer exists after its resolution, the game will continue. If both players fulfill one or more losing conditions at the same time, the game ends as a draw.
Starting the Fight
- If using a ride deck, each player separates their ride deck from their main deck, then takes the grade 0 unit from their ride deck and puts it face down on their (VC). If not using a ride deck, each player chooses a grade 0 unit from their main deck and puts it face down on their (VC). This unit is known as the player's "first vanguard".
- Each player shuffles their main deck and offers it to their opponent for a cut. Then each player puts their main deck into the deck zone face down, ride deck into the ride deck storage face down, G deck into the G zone face down, and any markers or tokens they plan to use near the G zone.
- Use a random method to decide who will take the first turn, such as rock-paper-scissors or a coin toss; the winner of the random method must go first. The player who goes first cannot declare an attack during their first turn.
- Each player draws five cards from their deck to form their opening hand. In turn order, each player may choose any number of cards from their hand, put them on the bottom of their deck, and draw the same number of cards. That player must shuffle their deck if they returned any cards this way. Both players may perform this step once each.
- When both players are ready, they simultaneously turn their first vanguards face up, and call out, "Stand Up, Vanguard!"
Turn Phases
Both players go through each of these phases in this order during their turns, until the game is over. All effects that occur within a phase or step must be fully resolved before players may move on to the next phase or step.
Stand Phase
Turn all of the cards on your field and order zone from [Rest] ![]() to [Stand]
to [Stand] ![]() .
.
Draw Phase
1. Draw Step
Draw a card.
2. G Assist Step
- Main article: G Assist
If you do not have a unit in your hand that is one grade higher than your vanguard, you may perform G Assist. This action will help you to not miss your chance to ride to the next grade. You may perform G Assist once per turn. If a ride deck is used, this step is not applied at all.
Ride Phase
1. Ride Step
During this step, you may ride a new vanguard. To do so, choose a unit from your hand whose grade is one greater than or equal to your current vanguard's grade, and place it face up on your (VC) as [Stand] ![]() . This action is called "normal ride." You may perform a normal ride once per turn.
. This action is called "normal ride." You may perform a normal ride once per turn.
If you are using a Ride Deck, instead of riding a unit from your hand, you may discard a card from your hand to ride a unit from your ride deck whose grade is 1 higher than the grade of your current vanguard. This is also considered a "normal ride," and you cannot ride from your ride deck if you have already normal rode during the same turn.
Whenever you ride a new vanguard, your previous vanguard is moved to your soul. If you ride a unit with an Imaginary Gift or Persona Ride icon, apply that icon's effect immediately.
2. Stride Step
- Main article: Stride
If both you and your opponent have a grade 3 or greater vanguard, or if you had a grade 3 vanguard at the start of this turn, you may release a G unit from your G zone by performing Stride. You may perform Stride once per turn.
In the Thai format, the requirements for Stride are different; you may stride if both you and your opponent have ever rode a grade 3 unit during the fight.
Main Phase
During the main phase, you prepare for battle by calling units and using abilities. You may do the following actions in any order and as many times as you want:
- Choose a unit card from your hand whose grade is equal to or less than your vanguard's grade, and place it face up on one of your (RC) as [Stand] . This action is called "normal call."
- You may normal call a unit onto a (RC) that already has a unit on it. In that case, after resolving any effects that activated from the call, the unit that was previously on that circle is retired (put into your drop zone).
- Move one of your rear-guards between the front and back row (RC) of the same column, or exchange the places of two rear-guards on (RC) in the same column. This does not change the units' [Stand] or [Rest] state. You cannot move a rear-guard to a different column with this action.
- Use an ability of one of your cards.
- Play a normal order or set order from your hand whose grade is equal to or less than your vanguard's grade. You may play only one order per turn. Place the order card face up in the order area, pay its cost (if any), follow its instructions, then put it into the drop zone (for a normal order) or the order zone (for a set order).
Once you are ready to attack, proceed to the battle phase.
Battle Phase
Note: The player who goes first may not perform the battle phase on their first turn.
During your battle phase, you may attack with your [Stand] ![]() units in the front row against your opponent's units. A battle is considered a battle from the moment it begins; even if the process of the battle is cut off midway or if any of the units in the battle leave the field, it still counts as a battle having taken place and always proceeds to the close step.
units in the front row against your opponent's units. A battle is considered a battle from the moment it begins; even if the process of the battle is cut off midway or if any of the units in the battle leave the field, it still counts as a battle having taken place and always proceeds to the close step.
1. Start Step
In the start step, you choose whether to attack or not. If you choose not to attack, or if you do not have any units that can attack, proceed directly to the end phase. Otherwise continue to the attack step.
2. Attack Step
In the attack step, you choose the units that will do battle. Choose one of your [Stand] ![]() units in the front row and [Rest]
units in the front row and [Rest] ![]() it, then choose one of your opponent's units in the front row to attack. These units become the "attacking unit" and the "unit being attacked", respectively, and they become each other's "battle opponents" until the end of this battle.
it, then choose one of your opponent's units in the front row to attack. These units become the "attacking unit" and the "unit being attacked", respectively, and they become each other's "battle opponents" until the end of this battle.
If you have a [Stand] ![]() unit with the Boost
unit with the Boost ![]() skill icon in the back row of the same column as the attacking unit, you may [Rest]
skill icon in the back row of the same column as the attacking unit, you may [Rest] ![]() it to have it "boost" the attacking unit. This unit becomes a "boosting unit" and the attacking unit becomes a "boosted unit" by the boosting unit for as long as both units are present in their respective circles or until the end of this battle. For as long as the unit is a boosting unit, its [Power]
it to have it "boost" the attacking unit. This unit becomes a "boosting unit" and the attacking unit becomes a "boosted unit" by the boosting unit for as long as both units are present in their respective circles or until the end of this battle. For as long as the unit is a boosting unit, its [Power] ![]() is continuously added to the [Power]
is continuously added to the [Power] ![]() of the boosted unit (including if its [Power]
of the boosted unit (including if its [Power] ![]() changes during the battle due to an effect).
changes during the battle due to an effect).
Some units have abilities that allow them to battle multiple units at once. In this case, all of the units specified by the ability become the "units being attacked."
3. Guard Step
In the guard step, your opponent may call guardians to defend against the attack. They may perform the following actions in any order and as many times as they want (or can be skipped, if the opponent declares something like "I don't guard").:
- Choose a unit card from their hand, and normal call it to (GC) as [Rest] . Unlike a normal call during the main phase, players may normal call a unit to (GC) regardless of its grade or the grade of their vanguard.
- Choose a rear-guard with the Intercept skill icon from their front row, other than a unit being attacked, and move it to (GC) as [Rest] (this is not considered a call). This may be done regardless of whether the rear-guard is [Stand] or [Rest] .
- Discard a card with "HEAL" (a heal trigger unit) from their hand to call a G guardian from face down in their G zone onto (GC) as [Rest] . They may only do this if both players' vanguards are grade 3 or greater and the number of face-up G guardians in their G zone is three or less.
- Play a blitz order from their hand whose grade is equal to or lower than their vanguard's grade. They may play one blitz order per turn. This follows the same procedure as playing a normal order during the main phase.
Each time your opponent calls or moves a new unit to (GC) during a battle, the unit becomes a "guardian." The opponent chooses one of their units being attacked, and the guardian will guard that unit. While the guardian is on (GC) guarding a unit, its [Shield] ![]() value is continuously added to the [Power]
value is continuously added to the [Power] ![]() of the unit it is guarding. A unit with no printed [Shield]
of the unit it is guarding. A unit with no printed [Shield] ![]() value is regarded as having [Shield]
value is regarded as having [Shield] ![]() 0.
0.
Once the opponent has finished, the guard step is over and the battle proceeds to the drive step. No further guardians may be brought into the battle after this step is over.
4. Drive Step
- Main article: Drive
- Main article: Trigger
In the drive step, if your attacking unit is a vanguard, you check for additional effects. Take the top card of your deck and put it into your trigger zone face up. If that card has a trigger icon, resolve all effects indicated by the trigger icon, in any order you like. Then, if that card is still in the trigger zone, put it into your hand, regardless of whether it has a trigger icon or not. This action is called a "drive check."
Perform a number of drive checks equal to your attacking vanguard's drive. By default, all units have drive 1, but units with the "Twin Drive!!" ![]() skill icon have drive 2 and vanguards with the "Triple Drive!!!"
skill icon have drive 2 and vanguards with the "Triple Drive!!!" ![]() skill icon have drive 3. If you perform multiple drive checks, each one must be fully resolved before the next one may begin.
skill icon have drive 3. If you perform multiple drive checks, each one must be fully resolved before the next one may begin.
If you are attacking with a rear-guard that can perform drive checks, apply the drive step for that unit.
5. Damage Step
In the damage step, players confirm whether or not the attack hits and the damage to be dealt.
Compare the [Power] ![]() of the two battle opponents. If the attacking unit's [Power]
of the two battle opponents. If the attacking unit's [Power] ![]() is greater or equal, the attack hits; otherwise, it does not hit. If either of the battle opponents have left the field, changed controllers or moved to another circle, then the attack is canceled and does not hit. Regardless of the outcome of the attack, all units on (GC) are retired (put into the drop zone) before resolving the rest of the attack.
is greater or equal, the attack hits; otherwise, it does not hit. If either of the battle opponents have left the field, changed controllers or moved to another circle, then the attack is canceled and does not hit. Regardless of the outcome of the attack, all units on (GC) are retired (put into the drop zone) before resolving the rest of the attack.
If the attack hits, one of two situations occur, depending on the unit that was hit:
- Vanguard: The attacking unit deals damage equal to its [Critical] to the attacked unit. If the attacking unit's [Critical] is 0 or less, then no damage is dealt.
- Rear-guard: The unit being attacked is retired.
If your opponent's vanguard is dealt damage by the attack, your opponent performs a "damage check." To do so, they reveal the top card of their deck and put it into their trigger zone. If that card has a trigger icon and is of the same clan as a unit on their field, they resolve all effects indicated by the trigger icon on the card, in any order they like. Then, if the card is still in the trigger zone, they put the card into their damage zone face up, regardless of whether or not a trigger effect was activated.
This process is repeated as many times as the damage dealt to the opponent's vanguard. If your opponent performs multiple damage checks, they must fully resolve each one before performing the next one. If your opponent has 6 or more cards in their damage zone, the game is over and they lose.
Note that there are no negative consequences for you or your units if your attack does not hit. Therefore it is usually best to attack with as many units as you can each turn.
6. Close Step
In the close step, all effects that happen "at the end of the battle" occur. After all such effects are resolved, the battle is considered to be over. Units that were designated as "attacking units", "units being attacked", and "battle opponents" during this battle are no longer treated as having any of these designations.
After this step, return back to your start step and choose whether or not to attack again. If you cannot or choose not to attack during your next start step, the battle phase is over.
End Phase
The end phase is where all actions and effects that occur at the end of a turn are activated and resolved. The following actions take place in the following order:
- All G units on your (VC) and (RC) return to your G zone face up.
- All locked cards and deleted units on your field return to normal state and are turned face up.
- All abilities with "at the beginning of end phase" and "at end of turn" activate, and you resolve them in the order of your choice.
- All effects with "until end of turn" that were applied this turn cease to be applied.
At this point, declare the end of your turn. Your opponent's turn now starts, beginning with their stand phase.
Card Mechanics
For a further glossary of game terms, see: Card Mechanics.
Comprehensive Rules
The "Comprehensive Rules" is the official manual designed to explain and detail all of the game rules and mechanics. While it explains everything in general, clarifications on individual cards may be found in the individual cards' rulings.
- Comprehensive Rules: English Edition (January 19, 2024)
- Comprehensive Rules: Japanese Edition (December 22, 2021)